 We had finished filming but were a bit late to edit as we needed to film more shots. We imported all our footage on to final cut pro. We had a lot of footage so it was difficult to differentiate which footage was which. We found all the shots we need to use and discarded bad footage. With all the different shot had it was easy to it consistent and flow really well. Shortening clips to make they hook up with the previous and next bit of footage. As we got our film completed we added effects as fading in and slow motion to add to the effect wanted to achieve. Some out our shots were very dark but in another sense it added to the audiences interest and curiosity to find out what he was doing. We got a really strong edit done and we were very pleased with the results. We worked really hard and well together considering we were a bit late filming.
Friday, 18 March 2011
Editing our film
We had finished filming but were a bit late to edit as we needed to film more shots. We imported all our footage on to final cut pro. We had a lot of footage so it was difficult to differentiate which footage was which. We found all the shots we need to use and discarded bad footage. With all the different shot had it was easy to it consistent and flow really well. Shortening clips to make they hook up with the previous and next bit of footage. As we got our film completed we added effects as fading in and slow motion to add to the effect wanted to achieve. Some out our shots were very dark but in another sense it added to the audiences interest and curiosity to find out what he was doing. We got a really strong edit done and we were very pleased with the results. We worked really hard and well together considering we were a bit late filming.
Thursday, 17 March 2011
Problems with filming.
On thursday 3rd March, our group were meant to start our filming, but unfortunately we could not film it on the monday that week. To our annoyance we could not start because of one of our members from our group did not turn up till 1hour later, and another member did not turn at all. Therefore we weren't organised with everything. We also did not think about what props to bring and what sort of angles we would use when filming. The lesson did not go well at all, so we decided to plan out everything properly so we could be prepared for next lesson.


We had to note down eveyrthing that we thought of.
Tuesday, 15 March 2011
Filming

Finding a location was difficult. We were let down at the last minute as our booked venue rejected us. We thought we could do it in the basement of the college, so we went to get permission from our teacher Bernard and needed to fill out a health and safety and managed to convince the security guards to let us film there. After me running up and down the stairs 5 times, they agreed to let us but Bernard checked on us regularly. We found the perfect location to film in because it had everything we needed such as a dark room. We prepared quickly and put our ideas into action. Our character need a mask so we thought to get a plain white theatre mask and cover it with blood.
After sorting out the lighting as Anisa brought in a torch and we got a red filter to go over it. We thought of all the different shots we could take setting up the beginning of our film.
Our first shot was the back of a unknown man and the camera never saw his face. Our initial shot consisted of us setting a dark and creepy tone by use of lighting sound and setting, as we knew we could make it great with final cut pro, by adding music to build up suspense and add titles. Our idea was that the unknown man was a killer who kept photos in his lair of those who he had killed. He puts on a mask to conceal his identity and we made good use of shadows and uncertainty to build suspense. We thought that when he picked up a photo he would remember the screaming of that victim and it would go back to when they died.
Wednesday, 2 March 2011
Introduction to cameras:Skills
In this lesson , I was taught how to work a camera, the principals and the key elements of it. My class started of by watching a presentation that was introduced by my teacher Bernald. I started of by learning the basics such as inserting the battery and the memory card. I also had to place the camera on the tripod which I have never done before so I was glad that I learnt that. The tripod was quite complicated to set up but i managed to get through it at the end. I did not realise that I could tilt the camera and twist it left and right while it was placed on the tripod.
At first when the teacher demonstrated how to work the camera, as in change the effects and adjusting the colours to look natural and consistent. I did not really understand but my group helped me out. I had to remember the buttons for auto focus (AF) and manual focus (MF). These two are both different things which I learnt. AF is when the camera focus itself and MF is when you, yourself is doing the focus. We were also demonstrated how to capture varies of shots such as medium and close ups. Pan and tilt shots were also included as they were more difficult to figure out. I had to practice and keep the camera steady. The group and I all took turns to work the camera and helped each other throughout the lesson. I learnt many new things and I am pleased that I can now work the camera.


At first when the teacher demonstrated how to work the camera, as in change the effects and adjusting the colours to look natural and consistent. I did not really understand but my group helped me out. I had to remember the buttons for auto focus (AF) and manual focus (MF). These two are both different things which I learnt. AF is when the camera focus itself and MF is when you, yourself is doing the focus. We were also demonstrated how to capture varies of shots such as medium and close ups. Pan and tilt shots were also included as they were more difficult to figure out. I had to practice and keep the camera steady. The group and I all took turns to work the camera and helped each other throughout the lesson. I learnt many new things and I am pleased that I can now work the camera.


TITLE SEQUENCE: True blood.
I have chosen 'True Blood' as my title sequence that I am going to analyse because it is very eye catching and the images seem to look very effective which makes me want to watch the film. The images in the title suggest that this film is a thiller and it is going to involve killing, children, blood and so on. The tittle already seems to make you feel afraid and the word "blood' suggests people dying. There are 9 images and each one has a different scene to it which tells a different story. This makes me feel anxious and want to watch more to find out what is happening.
In the first two boxes, there are images of animals. This could mean poisoned animals as both of them are not friendly. The snake with its mouth wide open emphasises the danger in the woods and that it could be the cause of the death in the film. The crocodile, which does not look innocent at all, with its eyes opened could mean evil. The lighting in all the images all seem to look very dark. The middle image shows a full moon shining through clouds, this immediately shows danger and keeps us on the edge of our seats throughout the opening scene.
The sound in the title sequence starts off with a blues quitar and the words come later which say ' I want to do something bad to you'. This suggests menacing content of the film and the southern states of America. Also it relates to good and evil as you see religious people involved in services and on the other hand you will also see sexual behaviour and drugs. The music is fast moving as well as the different types of scene shown throughout the title sequence. There was also a sign that i noticed which said "God hates drugs". It came on for a second then moved onto another scene, this could suggest that drugs are involved in this title sequence which meant why the film looks dangerous. I could see a extreme closeup of smoke coming out of a woman's mouth.
There were many nude imagines of woman being sexual on men and themselves. They were all captured in different shots such as medium, long and close ups. All the scenes were set from varies of places such as the woods which showed the old car and snake. This could tell us that someone could be trapped in the woods. It was a wide shot, the lighting was quite dark making the woods look quite horrifying. Throughout the title sequence, it played theme song till the end which shows there could be happy and exciting things in this film but very suspicious and mysterious. The little boy covered in red was quite threatening as it makes you think that it could be blood and young boys could be in danger. There was extreme closeup shots of different parts of his face such as his eyes and mouth.
Overall True Bloods is quite appealing as it creates curiosity and wonders in the audience. This is because the types of shots that were in the title sequence makes you confused. There are happy,religious and violent scenes. It gives you a variety of mixed emotions and makes you want to know what will happen.

Tuesday, 1 March 2011
Structure of Thriller openings
Film openings consist of three basic structures which are:
- Titles over a blank screen followed by a narrative opening
- A narrative opening that has the titles running throughout
- A discrete title sequence
There's also a fourth type of style of a film opening which can be referred to as 'stylized editing'
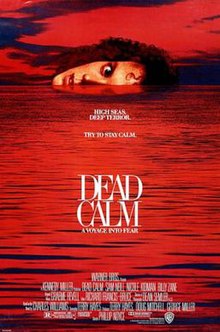
Titles over a blank screen, followed by a narrative opening
‘Dead Calm’ is an example. The effective of using this kind of haunting opening is that you can quickly show the titles sequence and move on into the narrative opening. Moreover the titles are bolder and clearer against the blank screen.
The lack of any image places more emphasis on the music, which represents doom is this sequence.
 A narrative opening that has the titles running throughout
An example of this is 'Panic Room'. In this opening no characters are seen or referenced but the surroundings and setting is shown. An establishing shot shows a modern financial district of a major American city. There are many birds’ eye views and long shots to make us look more deeply into the picture. The font used in this opening sequence is almost 3D and this really works well as the letters stand out clearly against the buildings.
A discrete title sequence
The thriller film, 'Se7en' creates curiosity by showing suspenseful footage in the opening as you don't know what is about to happen. Many juxtaposed close-ups of abstract, seemingly unrelated images are taken with a shaky, blurry camera hold.
'stylized editing'
This occurs when a range of editing techniques are used to thrill the viewer. In the opening, the film ‘Mezrine: Killer Instinct’ uses stylised editing. The title credits appear on a black screen while the special use of editing and split screen engages the viewer and maintains interest.
Subscribe to:
Posts (Atom)